Feb 15, 2011

Good Morning.

Good morning so far. Both little ones actually ate their breakfasts! No cajoling, threats or rumbling bellies on the way to school. I try to make our morning routine as pleasant as possible. Who wants to start their day screaming and hollerin?' Mornings are also time for Ian and I to spend a few moments alone. Chit chatting about stuff he's interested in while I prepare breakfast.

Ian lying on the couch watching Full House
Sweetpea eating her breakfast in Mama's chair
Sweetpea and Harley playing under the table
Anyway, I thought I'd practice my photography skills this morning. Figure you gotta start somewhere, right? The resource I'm using to help me learn to take better blog picture is Darren Rowse' Digital Photography School forum. If I work a little bit at it every day I can't help but get better, right?

Hmm. Wonder if I can make a light box today?

Spring Fever

I'm so ready for Spring! The cold, wind and snow have made me impatient for warmer weather. To bide the time I've been busy making seasonal preparations. The living room is where I've focused most of my efforts so far. Believe it or not, my color palate is pretty calm and light. Which is the exact opposite of my original intent!

I started off wanting juicy bold colors like citrus fruit! Pops of orange, green and/or yellow here and there. So I went out and purchased a pair of brass lamps at Goodwill to paint green. They came out pretty good but I had the hardest time accessorizing and making the green work with adjacent rooms. So the next day I painted the lamps light blue. Looks like the decor will be North Carolina Coastal! But I can work with it.


When the lamps were finished I decided to work accessories. Just grabbing things from around the house to make interesting vignettes. I bought a set of craft markers at Michael's and decided to experiment on a Thrift store vase I picked up for a couple of dollars. It originally had multicolored homemade flowers strewn across it with a shiny glaze. Very 1980's. So I primed and spray painted it blue. The white flowers and squigglies were done with white acrylic paint markers. I think I'll add yellow blooms for a shot of color later:

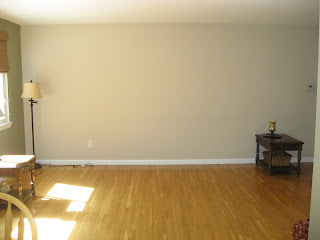
 Next up: layering a second accent color and textures to make the space come alive. Oh, and artwork! I need to do something with the big blank space behind he couch.

Oct 7, 2010

My Living Room

We've finally sold our townhouse and I can finally do some serious shopping for our new house. When I say "new" I mean new to us. Our current home is a rancher built in the 60's! We have neighbors who've lived in the area for 40 years! Ain't that sumthin?'

The hubby and I agree that we want to save a majority of the money we'll make on the sale of the townhouse. We're taking a small percentage to put the house together before November. That's prior to the holidays, our son's birthday and super cold weather.

My first challenge: the L-shaped living / dining room. This is what I'm working with:


My hubby wants chocolate brown leather furniture in here. Which is fine, I guess. I mean, we have leather furniture in the family room. Having it in both living spaces isn't ideal. But we have 4 kids and leather is so much easier to clean. Just wipe it and go.

So once again I'm faced with the the challenge of warming up the space with accessories. Throw pillows, carpet (I'm replacing the one under the dining table), lamps, etc will have to do the trick.

However, too much crap would clutter the place quickly. So I have to be thougthful in my selections. Tomorrow I'll post a list of accessories I think may work in the room.

I Went Dumpster Diving

I found these two babies at the dumpster near my mother's townhouse. They were dirty but in fairly decent condition. I thought my husband would be irritated when I lugged them into the house. But he simply looked at me cleaning them up then pitched in! Maybe his attitude changed when I said, "Look honey, they were free!"

Originally I envisioned painting them with some light antique-y finish. But Michael was all like "NO! You can't paint wood." So I'll have to figure out a way to make them seem "less heavy." These are big honkin' end tables. And our living room isn't the smallest (granted we haven't furnished it yet). What we put on, under and near them will make a big difference. Cuz if the scale is all wrong and weird I'll have to get rid of them. And I don't want to do that.


If I can't paint them then I'll just have to be satisfied changing the knobs. Some kind of fabric insert for the basket would be nice too. I may put books in there. Something colorful and functional for sure.

Jul 24, 2010

Beach Inspired Bathroom Art

The hubby and I have been racking our brain trying to come up with a beachy bathroom theme that kids and adult will like. The kids bathroom is also the "company" bathroom. So we want to keep things colorful, yet nice. we also don't want to spend too much moolah.

So last week I bought 2 Malma Mirrors at Ikea for $5 a piece. I pulled them out today and made great bathroom art. Even my hard to impress hubby likes it:
The supplies I used are:
2 Malma Mirrors ($5 a piece @ Ikea)
Torquoise craft paint (59 cents @ Michaels)
Primer (already had)
1 Sponge (already had)
Sand ($1 @ Michaels)
Wooden cut outs from Michaels (89 cents a piece @ Michaels)
Elmers Glue (already had)


Instructions
Paint the mirror with primer and dry.
Apply 2 coats of torquoise acrylic paint.
Lightly drag a sponge over the wet paint in one direction, then the other. Let dry.
Apply Elmers Glue at the bottom. Make sure you have good coverage. No gaps.
While the glue is wet pour sand on top. Wait a minute then pour excess onto a napkin or whatever is handy.
Affix wooden cutouts to your frame with glue or heat gun.

Jun 24, 2010

Cheap World Of Warcraft T Shirt

Here's a quick tutorial for making cheap WoW shirts.


Supply List:
Plain T-shirt  ($5)
Fabric transfer paper ($7)
Image (free)
Iron

1.) Plan your World Of Warcraft shirt design. Will the shirt be dark or light? Choose transfer paper based on the color of your shirt: light or dark.

2.)  Find the image you'd like on your shirt. You can find free graphics all over the web. I think we found the Horde Symbol used in the picture above on Picasa. Or you can do a search on World Of Warcraft art.

3.) Download the image to your computer.

4.) If you want, edit your image with a graphics program. There are tons of free ones to download. I used Irfanview to sharpen the image here.

5.) The free Avery Design & Print Online application can be used to create the layout. You can add images and texts under the Basic Designs Category.

6.) Once you're finished print your design onto transfer paper. It should print in reverse. You may need to use more than one sheet as you figure out which size looks best for your shirt.*

7.) Cut your decal out. Cut excess transfer paper from your decal. Otherwise it leaves a hard shiny film on your project. Not cute when working on dark material.

8.) Place your decal/s on your shirt and iron for a few minutes.

9.) Let cool then peel the back of the transfer paper off.

10.) Finished!

*Note - You can print more than one image on your transfer paper if you have space. It wastes less paper.

Jun 20, 2010

I Have My Eye On You

Instead of the usual couch/love-seat/chair furniture grouping I want to try something different this time around. Our new living room is much longer than our current one and has a wider window. Two wing-back chairs with a half moon wooden table between them would look great in there. It's perfect for quiet conversation, reading or entertaining.

Here's a fantastic wing back chair for $25 on craigslist:


I've emailed the owner to see if it's still available. If so, I'll pick it up tomorrow and sneak it into the our new house before my hubby gets home. sssshhhhhh! It's our secret.

BTW, is this slipcover the cutest thing or what?

Yeah! It's all very "neutral-ly." Nothing that brightly colored or patterned pillows couldn't remedy. Besides, hubby wants a wine or chocolate hued leather sofa.